You can build retaining walls for several reasons. They are both practical and stylish and create many opportunities by leveling a sloping plot. Here we tell you more about how to build retaining walls with concrete bricks.
You can build a retaining wall for several reasons
Retaining walls are walls with filling masses behind. In other words, they are one-sided and are as much an aesthetic element on the site as a functional one. The most common reasons for building a retaining wall are:
- Work plot
- Create interesting level differences
- Create conditions for construction with paving stones and tiles
- Provide support for discounts and other terrain
Which brick you choose depends on what kind of retaining wall you want to build and what function it should have.
Choose a wall according to the desired height and ground conditions
Some constructions with retaining walls place higher demands than others. If, for example, you are to create terracing for driveways, it is important that the retaining wall can withstand the load of the vehicle. It is best if you consult with the craftsman for your construction and consult at your nearest Stenbolaget store. You can also contact our customer service and read more under the product pages to see where each stone is suitable and able. For lower garden walls, you can build with most bricks, but for the more demanding environments, a more stable construction wall or L-support can be an alternative.
Some examples of building blocks for retaining walls are bricks in concrete, block stone walls, L-supports, gabions or leca blocks. Concrete bricks are the main retaining walls we sell and come in many different variants depending on the purpose.
How to build a retaining wall stably and neatly in seven steps
Planning and preparation are of utmost importance for a successful project.
Be careful in your planning stage and choose the right wall, color and stone choice for your particular wall and garden. The aesthetic choice needs to be made, but also the choice of a wall with the right construction. In our range, you will find a wide selection of walls, but with different constructions, adapted to different heights and places. If you feel that you need to brainstorm ideas with someone who really knows walls and its conditions, just get in touch with us. Visit our stores for a free consultation or call our customer service to advise and find solutions for your intended project.
When you are going to build a retaining wall, the first step is to dig out for the wall.
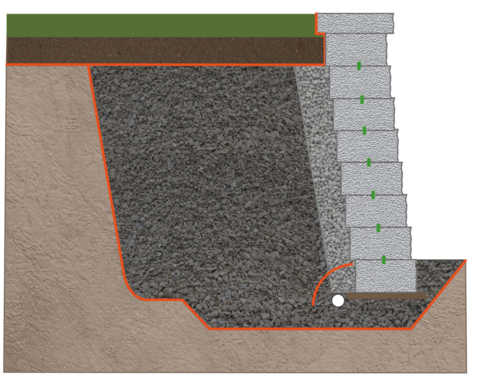
How much you should dig out depends on the height of your retaining wall. One guideline is to dig out as much behind the wall as it should be high. To bring out the depth you need to excavate, you simply count on the finished height of the wall. Keep in mind that 10% of the height needs to be below ground level. Also dig out a wider gutter as a foundation for your brick about 30 cm deep and 50 cm wide so that the bottom / foundation stone has a stable foundation to rest on.
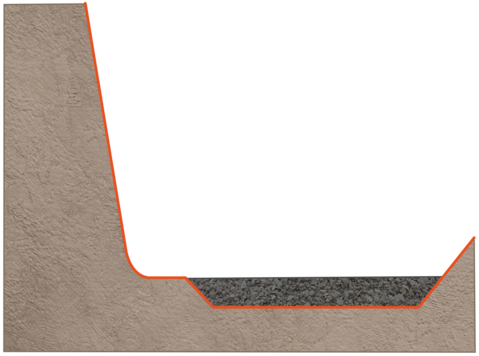
3. After digging out your retaining wall, cover the surface with a non-woven fabric.
Feel free to let the non-woven fabric go over the edges of the surface and then cut off with scissors or cut off with a knife. Remember to overlap all joints so that your non-woven fabric is tight. Then fill the entire gutter with rock crusher and pack the bed with a soil vibrator. You can rent this from your local machine rental company.
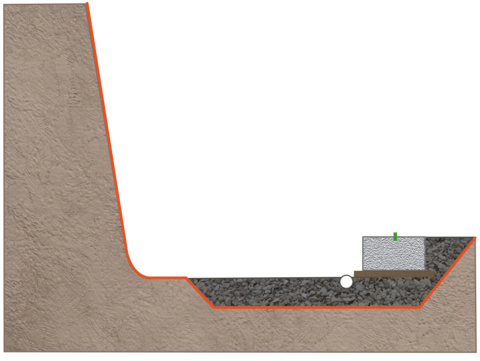
Smooth out with a small fraction of stone flour for a good bed.
Pack tightly again and check with the Level tester that the bed is even. Then lay the first row of stones in the middle of the gutter. Drive down your brick with the help of the rubber At this step, you also need to place any drainage pipes at an angle behind the brick. The drainage pipe helps you to direct water away from the wall. Saw to the pipes but a standard saw or angle grinder in the size you need and then make sure to place the pipe with a drop towards a well or other pipe that can lead the water further. Keep in mind that it is this step that will be fundamental to your entire wall that will now be built. Be careful and do not neglect the spirit level and the bed!
5. The first row is in place and time for backfilling and the next row of bricks
Some walls you fasten together with glue, others with locking plugs or a heel in the back edge of the stone. Retaining walls can also be built with geogrids to provide extra stability. Keep in mind that walls with a higher height also need to slope inwards for good stability. At this stage, you should also start filling up behind your wall. You fill up with macadam just behind the stone with a width of about 15% of the wall height and at least 15 cm. Complete with rock crusher on the remaining surface of the backing layer and compact the masses with your ground vibrator. If you have a retaining wall with cavities, you can also fill these with the rock crusher, but without vibrating.
Continue to build with rows of retaining wall and backfill
Build on with rows of your wall and backfill as you go with macadam and stone crushers that you carefully pack with the ground vibrator. Remember not to build up the entire wall directly, but do this in layers. You should vibrate your material in batches and make sure that all crushed masses are completely packed for a stable result. T INKING also to keep a minimum distance of 60 cm from the wall.

7. Once you have laid your last row of bricks, you can finish with a top stone
For best results, roll out non-woven fabric that protects the back of the wall from the soil layer if you are going to build a flower bed or lawn. You then glue the top stone, just as with any cornerstones. This gives a nice finish and is a must for some walls whose construction is not aesthetically pleasing at the top.